2.4. Editing a Bug
2.4.1. Attachments
Attachments are used to attach relevant files to bugs - patches, screenshots, test cases, debugging aids or logs, or anything else binary or too large to fit into a comment.
You should use attachments, rather than comments, for large chunks of plain text data, such as trace, debugging output files, or log files. That way, it doesn’t bloat the bug for everyone who wants to read it, and cause people to receive large, useless mails.
You should make sure to trim screenshots. There’s no need to show the whole screen if you are pointing out a single-pixel problem.
Bugzilla stores and uses a Content-Type for each attachment
(e.g. text/html). To download an attachment as a different
Content-Type (e.g. application/xhtml+xml), you can override this
using a ‘content_type’ parameter on the URL, e.g.
&content_type=text/plain.
Also, you can enter the URL pointing to the attachment instead of uploading the attachment itself. For example, this is useful if you want to point to an external application, a website or a very large file.
It’s also possible to create an attachment by pasting text directly in a text field; Bugzilla will convert it into an attachment. This is pretty useful when you are copying and pasting, to avoid the extra step of saving the text in a temporary file.
2.4.2. Flags
To set a flag, select either + or - from the drop-down menu next to the name of the flag in the Flags list. The meaning of these values are flag-specific and thus cannot be described in this documentation, but by way of example, setting a flag named review + may indicate that the bug/attachment has passed review, while setting it to - may indicate that the bug/attachment has failed review.
To unset a flag, click its drop-down menu and select the blank value. Note that marking an attachment as obsolete automatically cancels all pending requests for the attachment.
If your administrator has enabled requests for a flag, request a flag by selecting ? from the drop-down menu and then entering the username of the user you want to set the flag in the text field next to the menu.
2.4.3. Time Tracking
Users who belong to the group specified by the timetrackinggroup
parameter have access to time-related fields. Developers can see
deadlines and estimated times to fix bugs, and can provide time spent
on these bugs. Users who do not belong to this group can only see the deadline
but not edit it. Other time-related fields remain invisible to them.
At any time, a summary of the time spent by developers on bugs is
accessible either from bug lists when clicking the Time Summary
button or from individual bugs when clicking the Summarize time
link in the time tracking table. The summarize_time.cgi
page lets you view this information either per developer or per bug
and can be split on a month basis to have greater details on how time
is spent by developers.
As soon as a bug is marked as RESOLVED, the remaining time expected to fix the bug is set to zero. This lets QA people set it again for their own usage, and it will be set to zero again when the bug is marked as VERIFIED.
2.4.4. Life Cycle of a Bug
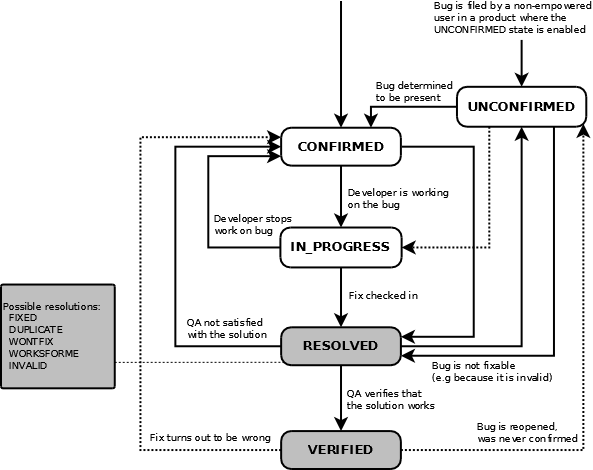
The life cycle of a bug, also known as workflow, is customizable to match the needs of your organization (see Workflow). The image below contains a graphical representation of the default workflow using the default bug statuses. If you wish to customize this image for your site, the diagram file is available in Dia’s native XML format.

This documentation undoubtedly has bugs; if you find some, please file them here.
